A/C Retrofit: Automating an Old Ducted System with Home Assistant
Discover how I turned an outdated ducted A/C into a smart, efficient system using Home Assistant, Fingerbots, and some DIY magic. Save energy and improve comfort!
Context
Our house has an old ducted air conditioning system installed long before we moved in. It is an Autralian company Actron Air, model SRA140C. I was looking to make it to a smarter A/C system that can be controlled remotely. Upon researching, I have very limited options:
- Actron air does have smart controllers, however our system is too old to be upgraded to a wifi controller
- Replacing a new system would cost us around $A9k, which I find unnecessary at the moment. It still works quite well and we don’t use our A/C intensively, mostly during the hottest days in summer, and much more often in winter.
So, I embarked on a quest to retrofit our A/C, making it smarter and controllable remotely with smart devices. I am not an electrical engineer, so although I wanted a cleaner solution, I had to find workarounds that worked for me.
Why? (or pain points)
Before diving into the solution, it’s worth sharing the biggest pain points with the current system and why it’s worth all the troubles (at least for me)
The house is divided into three zones: bedrooms (all three bedrooms), kitchen (and living area), and study. All three bedrooms are upstairs.
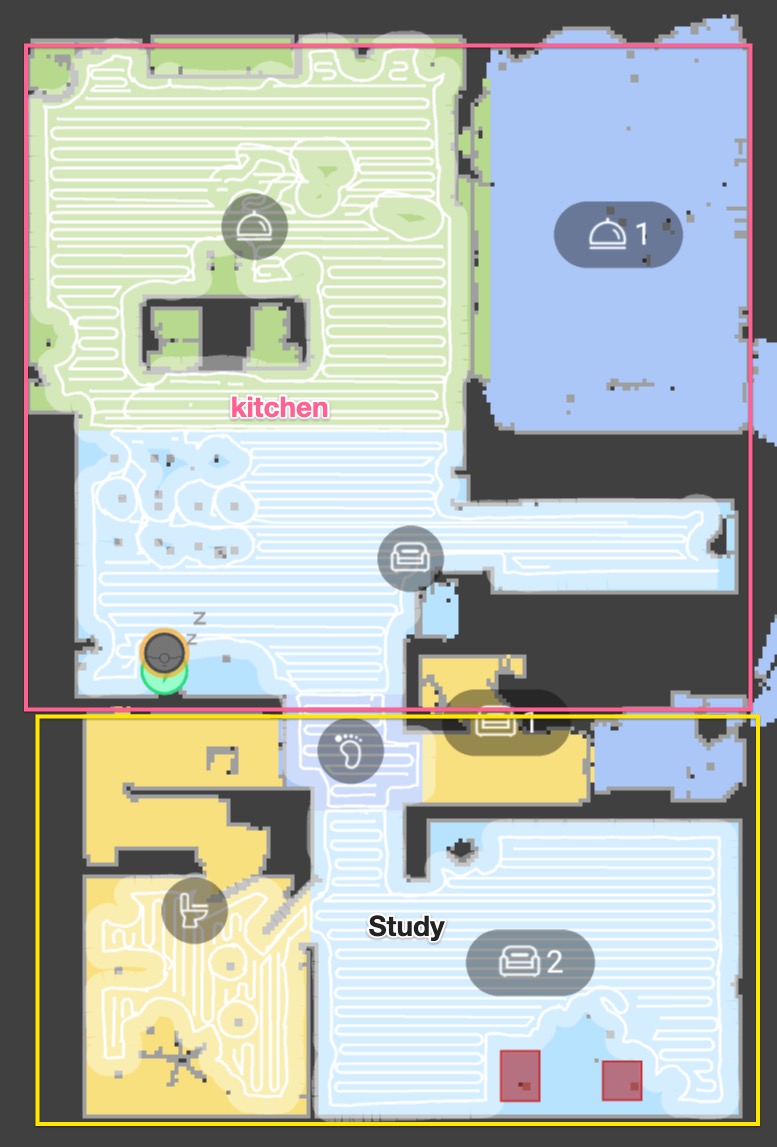
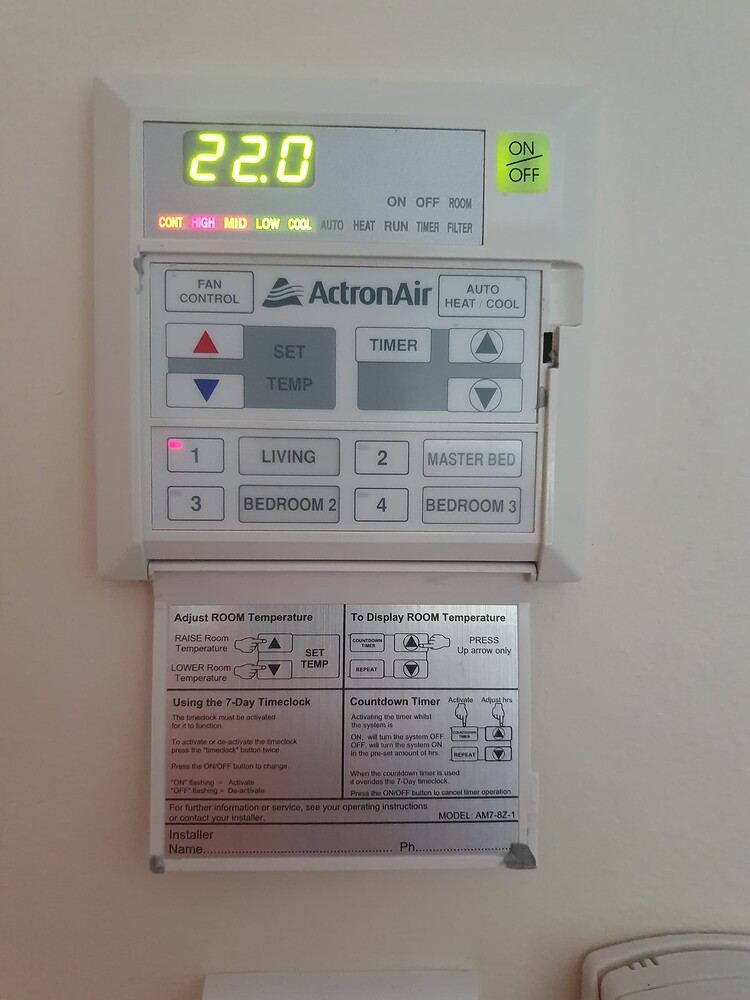
The thermostat is located at the bottom of the main controller, which is placed in the hallway upstairs. The picture below is not exactly the dashboard in my house but is very similar.
One of the biggest problems with this setup is when I want to heat my bedroom. I would turn on the bedroom zone and keep the kitchen and study zones off. With the bedroom doors closed (for obvious reasons), only a little air flows through the tiny door gap. As a result, even though the temperature inside the bedrooms is already above the set point, the system keeps running, making it very uncomfortable.
On the other hand, if I turn on both the bedroom and kitchen zones, the system’s capacity is insufficient, and the airflow in these two zones is very weak—insufficient to heat or cool a larger area like the kitchen. Consequently, the bedrooms become much cooler or hotter than desired, while the kitchen remains uncomfortable.
This setup is ineffective at heating or cooling the rooms, maintaining the desired temperature, and costs a lot to run (about AUD 3 per hour during peak hours).
Tools used
For my setup, I used:
- Home assistant: the heart of the system, allowed me to integrate with the devices and implement automations
- Zigbee Fingerbot Switch: instead of touching all the wires and electrical components that I have zero knowledge about, the fingerbots come to rescue. You would need 1 for the power switch, and one for each zone, for me I used 4.
- Temperature sensors: place one temperature sensor in each zone and use them to tell when the zone has reached the desired temperature to turn off the A/C.
- Zigbee2MQTT: the protocol to control fingerbots via home assistant.
- App Daemons: writing automations in Python, which is much easier to deal with complicated logic than the Home Assistant’s YAML syntax
- Some 3D printings in order to make a firm base to attach the fingerbots to the controller and press the buttons
How it works
I will skip the setup of Home Assistant, Zigbee2MQTT, and integrating the Fingerbots with Home Assistant via Zigbee2MQTT as there is ample documentation available on these topics.
Install the fingerbot switches and temperature sensors
Place the fingerbot switches around the A/C dashboard so that it could toggle on/off the main buttons, which are:
- Power
- Each zone in the dashboard
Have the temperature sensors installed in all the zones. For me I have one in kitchen, one of the bedrooms and the study room.
Make sure these switches and sensors are visible in home assistant
Setting up necessary helpers
We use Home Assistant’s helper entities, located under Settings > Devices & Services > Helpers.
| Helper | Type | Usage |
|---|---|---|
| input_number.room_temperature_setting | Number | The global desired temperature |
| input_number.ac_trigger_threshold | Number | Set the threshold to turn on the A/C, for example if desired temp is set to 22 degrees, and threshold is 1, then the A/C will be turned on when zone’s temperature falls below 21 (in case of heating), or rises above 23 (in case of cooling) |
| input_select.ac_mode | Dropdown | Two options, heating or cooling |
| input_select.ac_power_on_strategy | Dropdown | Two opions: all or any. All means the A/C should only be turned on when all managed zones’ temperature are out of the range, and vice versa for any |
| input_boolean.zone_ac_bedroom | Toggle | Control if bedroom zone should be managed by the automation |
| input_boolean.zone_ac_kitchen | Toggle | Control if kitchen should be managed by the automation |
| input_boolean.zone_ac_study | Toggle | Control if study should be managed by the automation |
It is also possible to have dedicated temperature and threshold settings for a certain zone, which override the global settings, for example I have a separate setting for bedroom with 2 extra helper entities:
| Helper | Type | Usage |
|---|---|---|
| input_number.bedroom_temperature_setting | Number | The desired bedroom temperature |
| input_number.bedroom_temperature_threshold | Number | The desired bedroom temperature threshold |
Turning on & off A/C
Turning on & off the A/C is pretty straightforward. The automation constantly listens to state changes of all temperature sensors and some settings such as the desired temperature or threshold and invoke a callback to determine the states of power switch.
Depending on the power all strategy, The A/C will be turned on when at least one active zone’s temperature falls out of the temperature range, or only when all active zones’ temperature are out of temperature range.
---
title: When power_on_strategy == all
---

flowchart TD
    subgraph all active zones are out of range
        subgraph Kitchen
            A(Kitchen temperature) --> A1{active}
            A1 --> |yes| A2{out of range}
            A2 -->|no| T1((Do nothing))
        end

        subgraph Bedroom
            B(Bedroom temperature) --> B1{active}
            B1 --> |yes| B2{out of temp range}
            B2 --> |no| T2((Do nothing))
        end

        A2 --> |yes|F((Turn on A/C))
        B2 --> |yes|F
    end
---
title: When power_on_strategy == any
---

flowchart TD
    subgraph Kitchen
        A(Kitchen) --> A1{active}
        A1 --> |yes| A2{temp is out\n of range}
        A2 -->|no| T1((Do nothing))
        A2 --> |yes|F1((Turn on A/C))
    end

    subgraph Bedroom
        B(Bedroom) --> B1{active}
        B1 --> |yes| B2{temp is out\n of range}
        B2 --> |no| T2((Do nothing))
        B2 --> |yes|F2((Turn on A/C))
    end
Turning off A/C is even more straightforward, the automation will loop through all active zones, check if they have all reached the desired temperature and make the decision to turn it off or keep it running.
flowchart
    subgraph Turning A/C off flow
        Z((A/C is on)) --> A
        A[Sensor updates] --> B(Loop through active zones)
        B --> E{All zones have\n reached \ndesired temp?}
        E -->|Yes| F(Turn off A/C)
        E -->|No| G(Keep A/C on)
    end
Turning on & off zones
Determining which zones to be turned on or off to maximize efficiency, reduce running cost is a little bit more complicated. To control the zones, I introduced a concept of priority, where zones of the same priority will be running together, and zones with lower priority will run after higher priority zones reached the desired temperature.
For me, Study & Bedroom have higher priority, since they are smaller and can be heat up/cool down pretty quickly, whereas Kitchen is much bigger and takes much more time to reach desired temperature, it’ll be turned on last.
1
2
3
4
5
6
7
8
9
10
11
12
13
14
15
16
17
18
19
20
21
22
23
24
25
26
27
28
29
30
31
32
33
34
35
36
37
38
39
40
def determine_zone_switch_states(self, trigger_zone: Zone = None):
    # Get all active zones
    active_zones = self.active_zones()

    # Initialize all active zones to 'off' state
    states = {zone.name: 'off' for zone in active_zones}

    # If a specific zone triggered the function, prioritize it
    if trigger_zone:
        states[trigger_zone.name] = 'on'
        return states  # Return early as this zone takes priority

    # Cache frequently used values to avoid repeated method calls
    desired_temp = self.get_desired_temperature()
    mode = self.get_mode()
    trigger_threshold = self.get_trigger_threshold()

    # Iterate through zone groups in order of priority
    for index, group in enumerate(self.zone_groups()):
        group_active = False  # Flag to check if any zone in the group is active

        for zone in group:
            if zone.is_running():
                # If zone is running, turn it off if desired temp is reached, else keep it on
                states[zone.name] = 'off' if zone.has_reached_desired_temp(desired_temp, mode=mode) else 'on'
            else:
                # If zone is not running, turn it on if out of desired temp range, else keep it off
                states[zone.name] = 'on' if zone.is_out_of_desired_temp(desired_temp, trigger_threshold, mode=mode) else 'off'

            # Update group_active flag if any zone in the group is set to 'on'
            group_active = group_active or states[zone.name] == 'on'

        if group_active:
            # If any zone in this group is active, turn off all zones in lower priority groups
            for lower_group in self.zone_groups()[index + 1:]:
                for zone in lower_group:
                    states[zone.name] = 'off'
            break  # Exit the loop as we don't need to process lower priority groups

    return states  # Return the final state of all zones
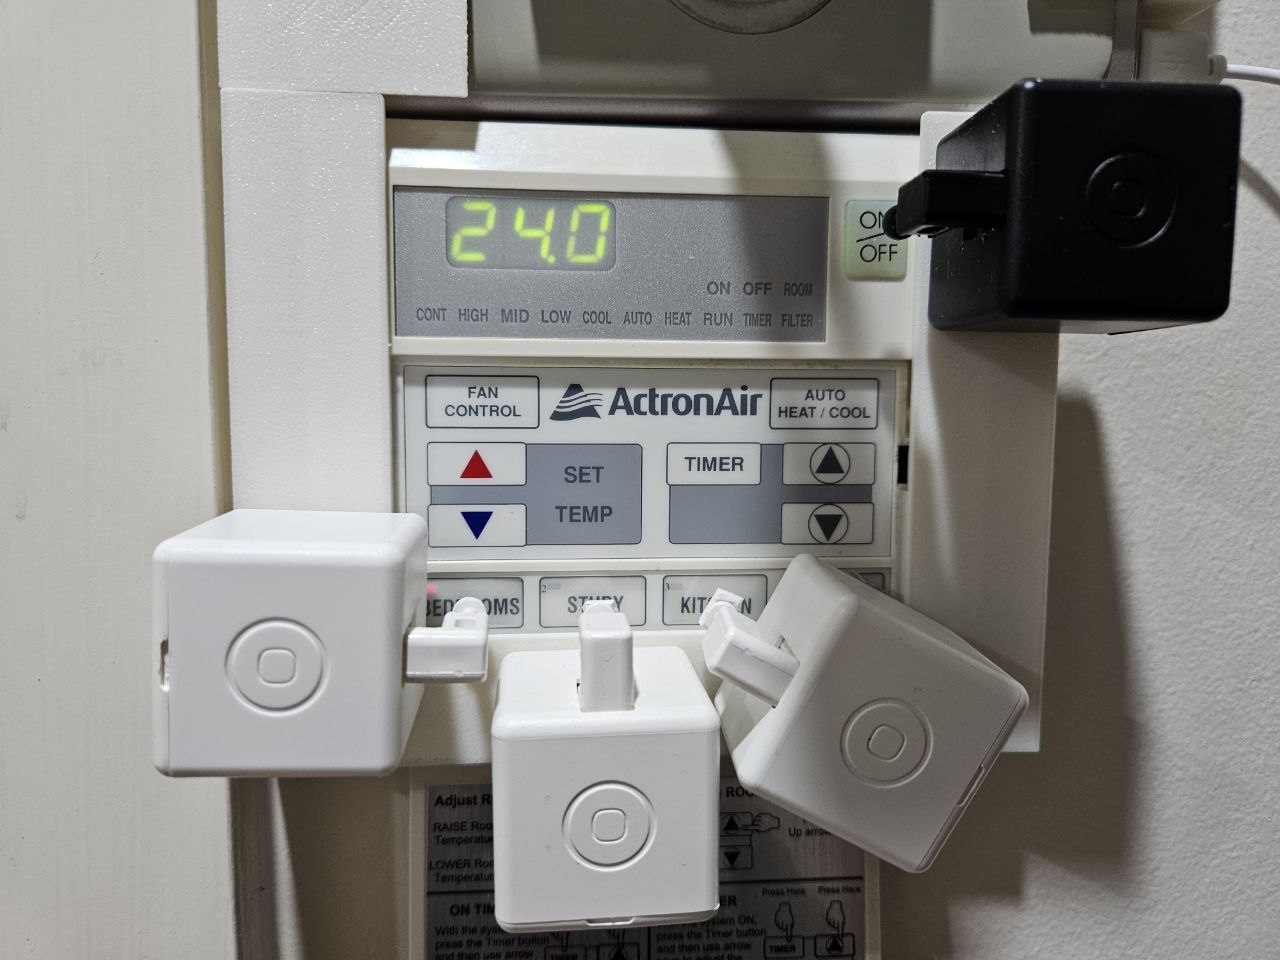
Putting everything together
Below is the picture of the A/C dashboard with all fingerbots attached.
Creating an AppDaemon app and all the necessary parameters by adding to the
apps.yaml file:
1
2
3
4
5
6
7
8
9
10
11
12
13
14
15
16
17
18
19
20
21
22
23
24
25
26
27
28
ac_controller:
  module: ac_controller
  class: AirconController
  use_dictionary_unpacking: true

  bedroom:
    temperature_entity_id: sensor.air_purifier_temperature
    switch_entity_id: switch.ac_bedroom_switch
    state_entity_id: input_boolean.ac_zone_bedroom
    desired_temperature_entity_id: input_number.bedroom_temperature_setting
    threshold_entity_id: input_number.bedroom_temperature_threshold
    priority: 1
  kitchen:
    temperature_entity_id: sensor.living_room_temp_humidity_temperature
    switch_entity_id: switch.kitchen_ac_toggle_switch
    state_entity_id: input_boolean.ac_zone_kitchen
    priority: 2
  study:
    temperature_entity_id: sensor.study_room_temp_humidity_sensor_temperature
    switch_entity_id: switch.bedrooms_ac_toggle_switch
    state_entity_id: input_boolean.ac_zone_study
    priority: 1

  desired_temperature_helper_id: input_number.room_temperature_setting
  trigger_threshold_helper_id: input_number.ac_trigger_threshold
  power_on_strategy_entity_id: input_select.ac_power_on_strategy
  power_switch_entity_id: switch.0xa4c1381d66a4abf0
  ac_mode_entity_id: input_select.ac_mode
Creating a simple Home Assistant dashboard to control the zones:
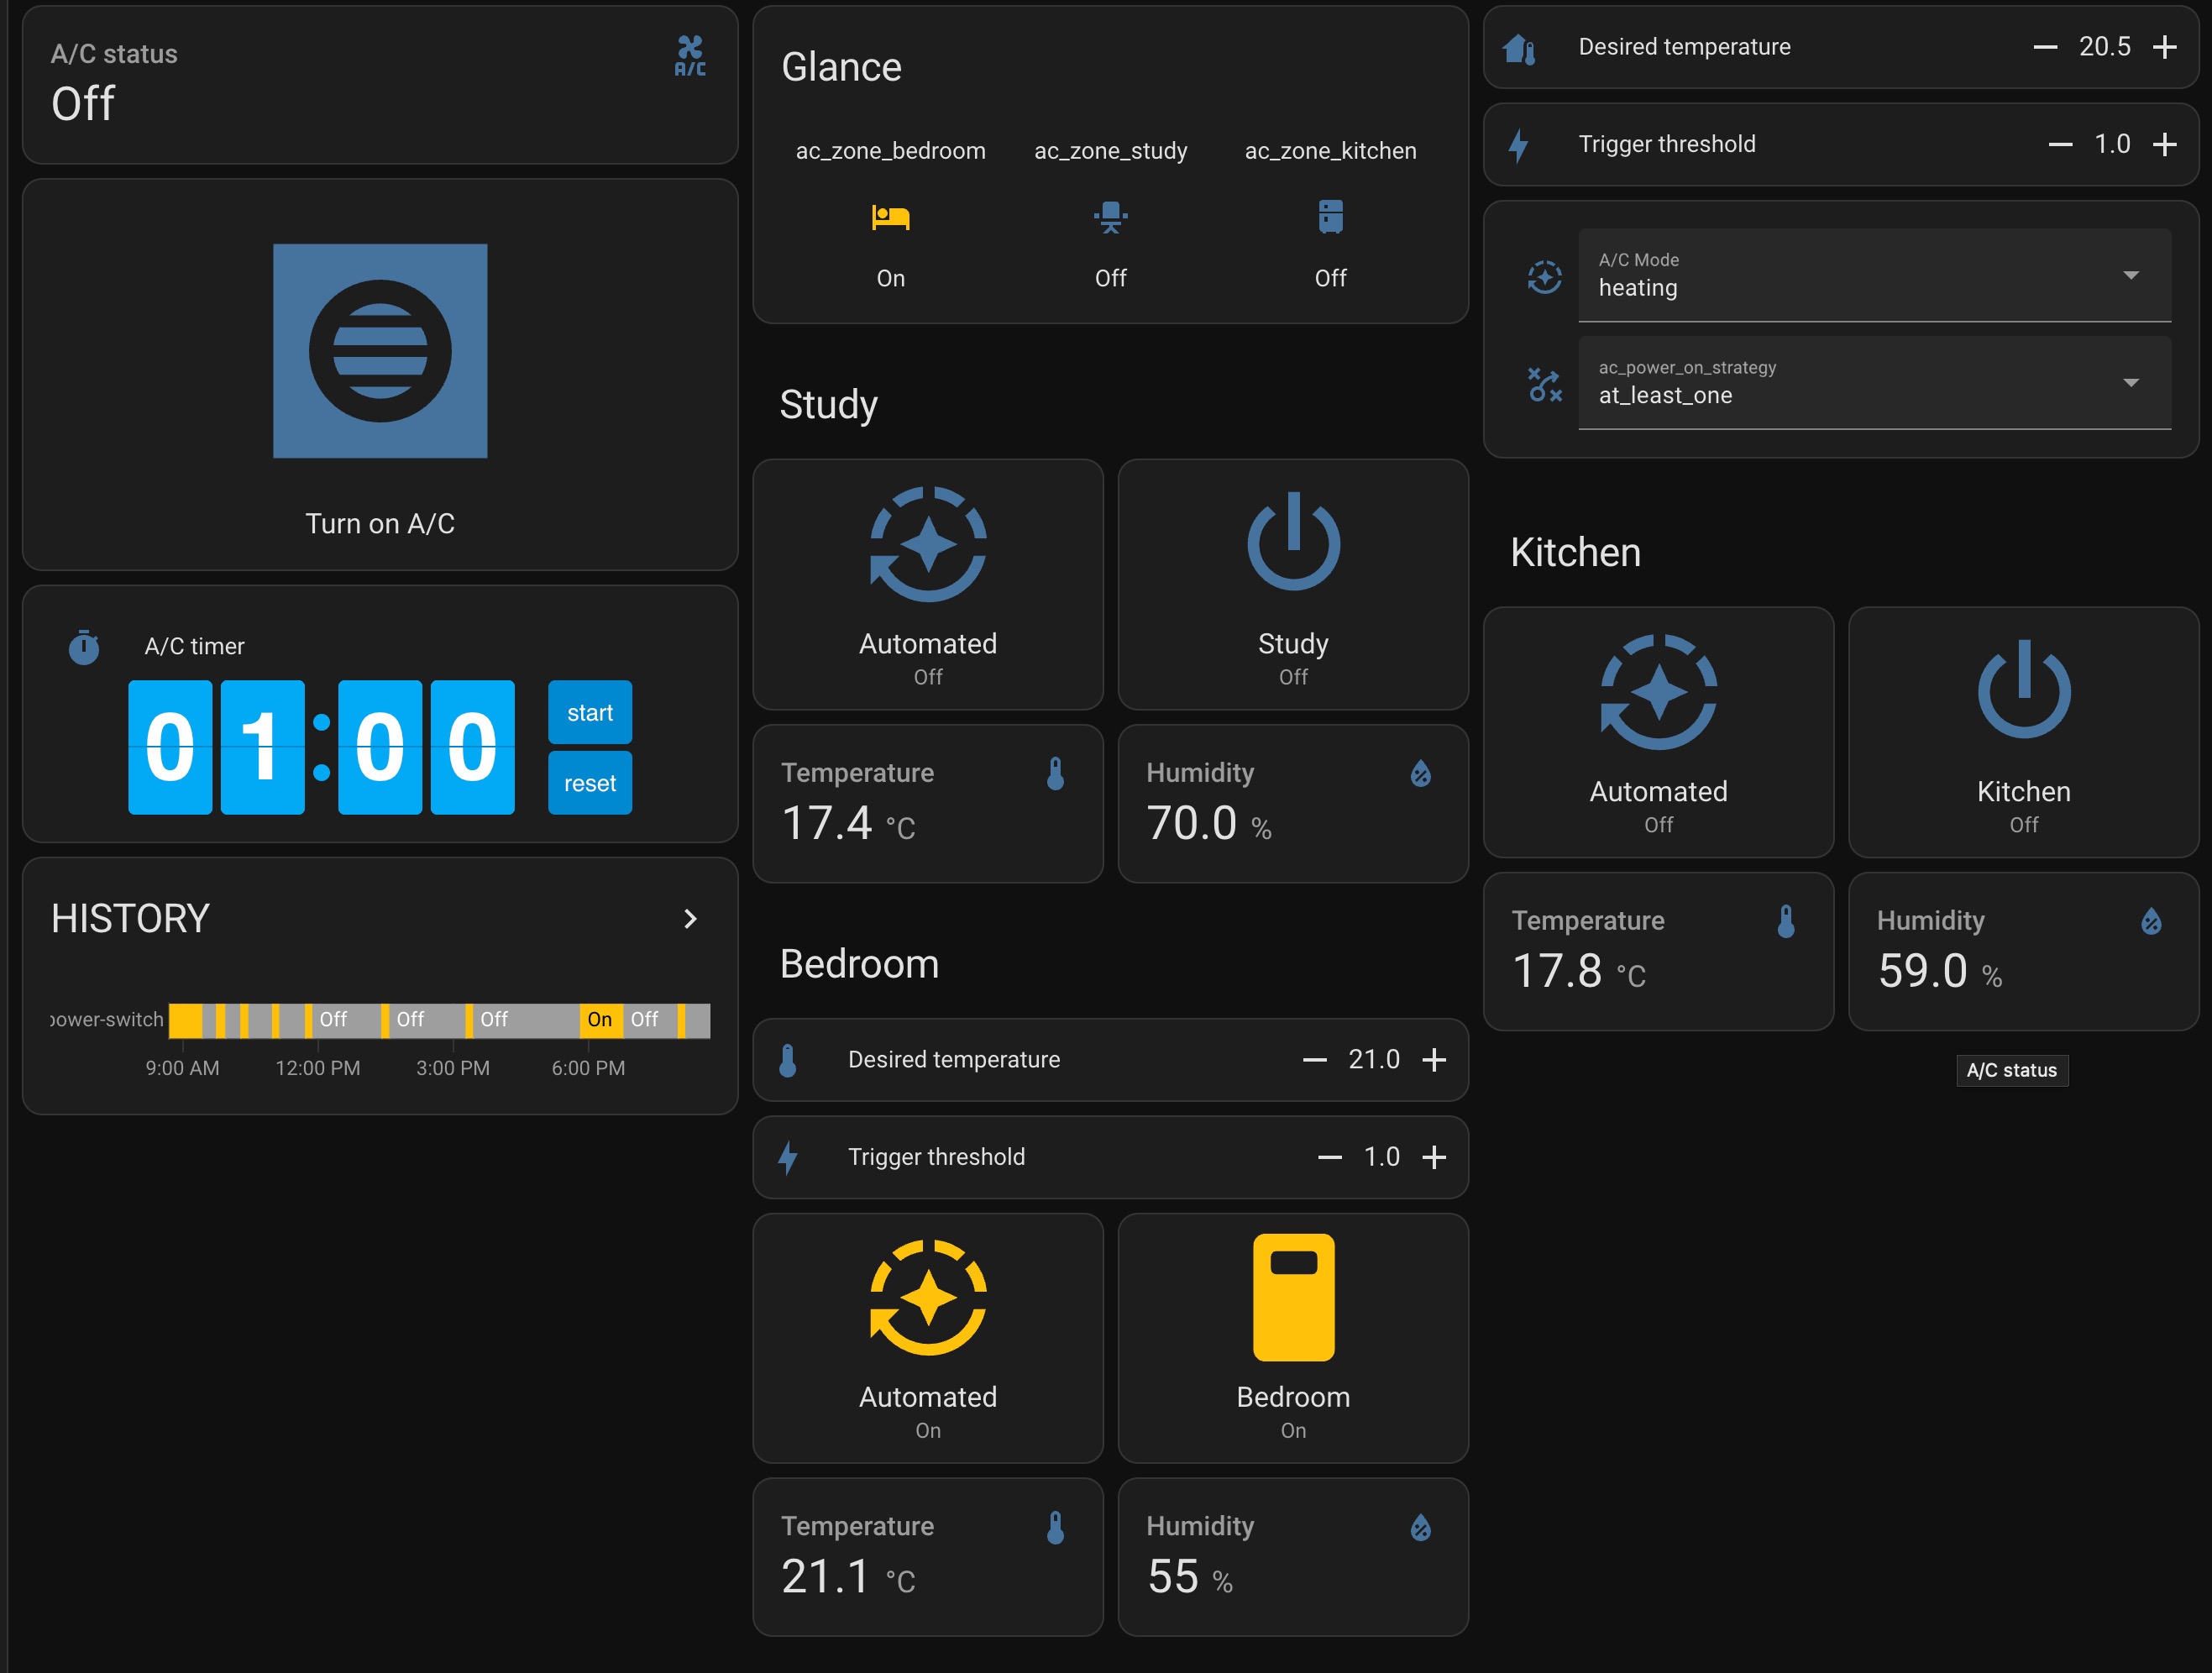
I also created another AppDaemon app to sync the state of the switches with the actual state of the zones in the dashboard, which you can find in the Github repo.
Summary
Personally for me, my low cost, low tech solution to control the A/C in a smarter way is working really well. The temperature of each zone is managed and maintained seperately, rather than being too hot or too cold. It also saves a lot of money to run as it’ll be turn off as soon as it should.
This solution is not limited to Actron Air but should be usable for other vendors, as long as they can be controlled by the fingerbots and have enough space to place all the switches.
The table below is a breakdown of the items that I bought:
| Item | Cost (AUD) |
|---|---|
| Zigbee fingerbot switches | 4 x 22.44 |
| Temperature sensors | 3 x 17.11 |
| Zigbee dongle | 31.95 |
| 3D prints | 10 |
| Total | $173 |
There are a few issues and limitation of this approach though:
- The A/C power switch sometimes double clicks, meaning it would click and immediately follow by another click, leaving an inconsistent state between Home Assistant and the actual state. I think this could be due to the zigbee2mqtt where it must be timed-out occassionally. I plan to address this by adding an esp32-camera and a small machine learning model to check and sync status of the switches periodically
- Similarly the states of fingerbot switches could sometimes go out of sync, and I have to manually sync them. It’s not too big of an issue as it doesn’t happen very frequently
- Some other settings are still manual, such as Fan control (I barely touch this), or Timer (not really needed anymore, also could be replicated with Home Assistant)
- It makes the A/C dashboard looks ugly and messy
Code & Resources
P.S: all the links to Aliexpress are affliated links, you can support me by going to Aliexpress via those links.
Comments powered by Disqus.